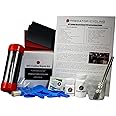
Item Package Dimensions L x W x H | 7.7 x 5.3 x 3.4 inches |
---|---|
Package Weight | 0.29 Kilograms |
Brand Name | Predator Cycling |
Country of Origin | United States |
Number of Items | 1 |
Manufacturer | Predator Cycling |
Part Number | DIY_CR_kit_2015 |
Size | 1 Count (Pack of 1) |
Carbon Repair Kit, Do It Your Self
Learn more
Purchase options and add-ons
Brand | Predator Cycling |
Item Form | Wipe |
Specific Uses For Product | Bike Frame, Carbon Repair, |
Unit Count | 1 Count |
Surface Recommendation | Plastic, Fabric |
About this item
- Carbon Fiber 3k weave fabric and epoxy for bicycle frame repair
- Black, twill fiber weave that make frames lightweight
- Includes epoxy, hardener, sand paper, brush, gloves, acetone, and instructions
- DIY, easy-to-use kit for small cracks and abrasions
- Includes video link with follow-along instructions from a professional
Additional Details
Frequently bought together
Videos for similar products
Product Description
The DIY, at-home solution to repairing and maintaining your prized carbon fiber bicycle! All necessary materials included as well as a list of recommended materials. Comes with instruction manual and link to 3-part video series!
Cracked or damaged carbon fiber bike frame? We know that having a professional repair can be a chore! Now offering an all-encompassing DIY Carbon Repair Kit. Packed with top-of-the-line supplies, our kit allows the crafty cyclist to repair his/her small to medium crack in a jiffy!
What comes in your kit?
- (1) bottle of epoxy (see instructions for volume ratio)
- (1) bottle of hardener (see instructions for volume ratio)
- (2) plastic mixing cups
- (1) pair latex gloves
- Sandpaper: (1) 3"x5" 120 wet/dry, (1) 3"x5" 220 wet/dry, (1) 3"x5" 320 wet/dry
- (2) acetone/alcohol sanitizing wipes
- (1) 2 yards heat compression tape
- (1) 5.8 oz 3K, 2x2 Twill carbon fiber fabric weave, 6"x12"
- (1) printed instructional guide
- (1) web link to video instruction, 3-part series
Recommended Materials (Not Supplied in Kit)
- electrician's tape or equivalent
- masking tape / painter's tape
- plastic wrap
- paper towels / rags
- safety glasses / masks
- utility clamps / spring clamps
- water spray bottle
- rat tail file
- scissors
- small heater
- heat gun / hair dryer
3-Part Video Series assists with repairs!
|
|
|
---|---|---|
*This Do-It-Yourself carbon repair kit is intended for small to medium carbon fiber cracks. |
*For complete and professional carbon repair services, please consult with a composite specialist. |
*User of this kit agrees to hold hamless Predator Cycling, LLC. and any of its employees or contractors, for any damage or injury caused via the use of any portion of this kit. |
|
|
|
---|---|---|
Carbon Fiber:
|
|
|
Product information
Technical Details
Additional Information
ASIN | B00UMATXWY |
---|---|
Customer Reviews |
4.3 out of 5 stars |
Best Sellers Rank | #213,912 in Sports & Outdoors (See Top 100 in Sports & Outdoors) #218 in Bike Tool Kits |
Date First Available | March 12, 2015 |
Feedback
Important information
Legal Disclaimer
DIY Kits are for at-home repair. Please seek out a licensed professional technician for repaired service warranties.
Looking for specific info?
Customer reviews
Customer Reviews, including Product Star Ratings help customers to learn more about the product and decide whether it is the right product for them.
To calculate the overall star rating and percentage breakdown by star, we don’t use a simple average. Instead, our system considers things like how recent a review is and if the reviewer bought the item on Amazon. It also analyzed reviews to verify trustworthiness.
Learn more how customers reviews work on AmazonCustomers say
Customers like the quality, value, and ease of use of the cleaning agent. For example, they mention it's a great repair product, works well, and is worth the money. That said, some appreciate the straightforward instructions.
AI-generated from the text of customer reviews
Customers are satisfied with the quality of the carbon fiber repair kit. They mention that it is easy to use, works perfectly, and the repair is solid. Some customers also say that the product is incredibly strong and will never break in the same area again.
"...A few coats left a very nice protective layer that I’m happy with, with the exception of a little roughness at the edges of the spray..." Read more
"Excellent product, worked as described. Saved me $2000 by not have to replace my carbon fiber frame.Thank you!" Read more
"...No sign of weakness or new crack. I’m riding in pretty rough trails so I can tell that those carbon sheep are very strong" Read more
"This was my first attempt and it turned out pretty good. I used eight layers. Electric sander, then went down to hand sanding...." Read more
Customers find the cleaning agent easy to use and the instructions straightforward.
"...This product saved me $800 or a rear triangle! It was easy to use and I have been riding for the last 6months with and it handle pretty well...." Read more
"...I found it all to be fairly easy, except when it came to applying the shrink tape. That was a NIGHTMARE. Mostly due to the location of the repair...." Read more
"...Instructions were very straightforward and easy to follow. Highly recommended!!" Read more
"...Easy to use and works great! The staff was very helpful as well." Read more
Customers appreciate the value of the cleaning agent. They say it's well worth the money.
"...very well to fix a crack on my seat stay, saving my frame for a reasonable cost...." Read more
"...Watched recommended video and had professional results! Well worth the money!" Read more
"Over-priced, but cheaper than professional job..." Read more
Reviews with images
-
Top reviews
Top reviews from the United States
There was a problem filtering reviews right now. Please try again later.
One tip: make sure the epoxy soaked carbon sheets don’t move out of position as you’re wrapping the heat shrink tape. Mine slid ~1cm, which ended up being ok.
They recommended covering the repair to prevent UV damage, so I used 368-0061 clear coat spray (Be careful around this stuff, it’s like aerosol super-glue) to finish after sanding. A few coats left a very nice protective layer that I’m happy with, with the exception of a little roughness at the edges of the spray (I didn’t spray the whole frame).
Reviewed in the United States on March 22, 2024
One tip: make sure the epoxy soaked carbon sheets don’t move out of position as you’re wrapping the heat shrink tape. Mine slid ~1cm, which ended up being ok.
They recommended covering the repair to prevent UV damage, so I used 368-0061 clear coat spray (Be careful around this stuff, it’s like aerosol super-glue) to finish after sanding. A few coats left a very nice protective layer that I’m happy with, with the exception of a little roughness at the edges of the spray (I didn’t spray the whole frame).
Thank you!
The materials in this box cost at MOST $25, so a price of $99 seems gouge-y to me.
Reviewed in the United States on January 25, 2024
I have attached pictures of the repair:
1. Microphone boom with temporary repair using electrical tape.
2. After removing the electrical tape I epoxied one edge of the carbon fiber to the 1/4" diameter shaft and let it set. Then I coated the entire carbon fiber strip and wrapped it around the microphone boom. The kit also includes heat shrink tape which I wrapped around the carbon fiber. I then applied heat to the tape using a hair dyer. The tape did a great job constricting the carbon fiber and sealed the repaired area.
3. Clamps were used to align the fragile 1/4" microphone boom while the epoxied carbon fiber cured for 24 hrs.
4. After curing the heat shrink tape was removed and the area was sanded with the sandpaper paper that was provided with the kit.
5. I used a black permanent marker to match the color of the microphone. When I delivered it to the customer they wer very pleased with the results.
The carbon fiber repair kit did a great job and it will never break in the same area again!
Reviewed in the United States on February 20, 2018
I have attached pictures of the repair:
1. Microphone boom with temporary repair using electrical tape.
2. After removing the electrical tape I epoxied one edge of the carbon fiber to the 1/4" diameter shaft and let it set. Then I coated the entire carbon fiber strip and wrapped it around the microphone boom. The kit also includes heat shrink tape which I wrapped around the carbon fiber. I then applied heat to the tape using a hair dyer. The tape did a great job constricting the carbon fiber and sealed the repaired area.
3. Clamps were used to align the fragile 1/4" microphone boom while the epoxied carbon fiber cured for 24 hrs.
4. After curing the heat shrink tape was removed and the area was sanded with the sandpaper paper that was provided with the kit.
5. I used a black permanent marker to match the color of the microphone. When I delivered it to the customer they wer very pleased with the results.
The carbon fiber repair kit did a great job and it will never break in the same area again!